Congratulations! By clicking on this article, you just took the first step towards achieving killer search rankings for your Shopify store. Optimizing your Shopify store for search engines is one of the most effective ways to increase high-quality traffic and boost your sales.
Most of us can recall a time when we typed a product into Google and completed a purchase. 44% of online shoppers start their online shopping journey with a Google search (nChannel). But, how many times did you scroll through the 2nd, 3rd, or 4th page of search results to find what you were looking for? I’m willing to bet your answer is “almost never”!
If your Shopify store makes it on page 1 of Google for your target keyword, you’re in great shape! While there are many other factors that determine whether a person completes a purchase, getting the right people to visit your Shopify store is a crucial first step.
In a nutshell, this demonstrates why Shopify SEO (search engine optimization) is so crucial. The higher your search engine ranking on a search engine results page (SERP), the more traffic you’ll get. The higher the page number you rank on, the less traffic you’ll get. And, the more traffic you get, the more sales you’re likely to generate. Getting a high SERP ranking is the name of the game and ecommerce SEO mistakes can be costly for your business!
So, what can you actually do to boost your rankings without paying a fortune in Google ads?
In this extensive guide, we’re covering everything you’ll need to know to increase the organic search rankings of your Shopify store. Let’s dive in!
Regular SEO VS. Shopify SEO
Whether you’re doing regular SEO or Shopify SEO, the fundamentals will always stay the same. However, there are best practices, built-in Shopify features, and important aspects that make Shopify SEO unique.
Any general ecommerce SEO tips and best practices you’ve already learned will still come in handy when optimizing your Shopify store. For this article, we’re breaking down the aspects that are exclusive to Shopify SEO so you can level up your SEO knowledge and give your Shopify rankings the extra boost they may need to earn that lucrative page 1 spot.
The 5 Essential Aspects of Shopify SEO
This guide covers the following aspects of optimizing your Shopify store:
1. Start with Keyword Research
Before you do anything else, you need to get your keywords in order. Keyword research is the foundation of any eCommerce SEO campaign and affects your technical SEO, user experience, and website architecture.
Your products may have the opportunity to rank for multiple keywords, but it’s important to choose the right keyword that is the best fit for your products and business and will resonate with your target audience.
What search term is your target audience actually plugging into Google when looking for your products?
How Ecommerce Keywords are Different
Before we dive into the process of keyword research, we need to understand the basics of eCommerce keywords. Spoiler alert: regular SEO keywords (informational keywords) and eCommerce keywords (commercial keywords) are not the same!
Most blogs and sites with a lot of content want to target informational keywords. For example, a social media company might target the keyword “how to increase Instagram followers”. This would help them target customers seeking information relevant to their business and services.
As a Shopify store, you want to rank for commercial keywords that show buying intent. For example, “t-shirts for women” would be a commercial keyword. If someone entered this search term into Google, it’s likely that they intend to make a purchase.
Note: This does not mean that “informational keywords” can never be used as e-commerce keywords. For example, let’s say you sell car accessories. You may choose the informational keyword “How to fix car rearview camera” to target people with indirect buying intent. However, a more direct approach would be to target a commercial keyword such as “Buy car rearview camera”.
E-Commerce Keyword Research Tools
Now that you understand the types of keywords you should be using, it’s time to discuss how to actually find these keywords. Remember: you don’t just want any random keyword that relates to your brand. You want keywords that people are actually using to find products related to those you are selling.
Luckily, there are many tools available to help you through this process!
If you’re looking to really invest in your keyword research, you can opt for a paid tool such as AHREF, SEMrush or Keyword Tool Dominator. However, there are also some great keyword research tools that are free to use! For example, you can use search results on Amazon or the Google Keyword Planner tool for free. We’ll show you how to use both tools in the following sections.
Keyword Research with Amazon Search Results
Amazon is one of the biggest eCommerce websites and, therefore a great place to go for some free initial research for your Shopify store! Amazon merchants are also your competitors, so it’s helpful to understand their strategies.
Here’s your step-by-step process for using Amazon search results as a preliminary keyword research tool:
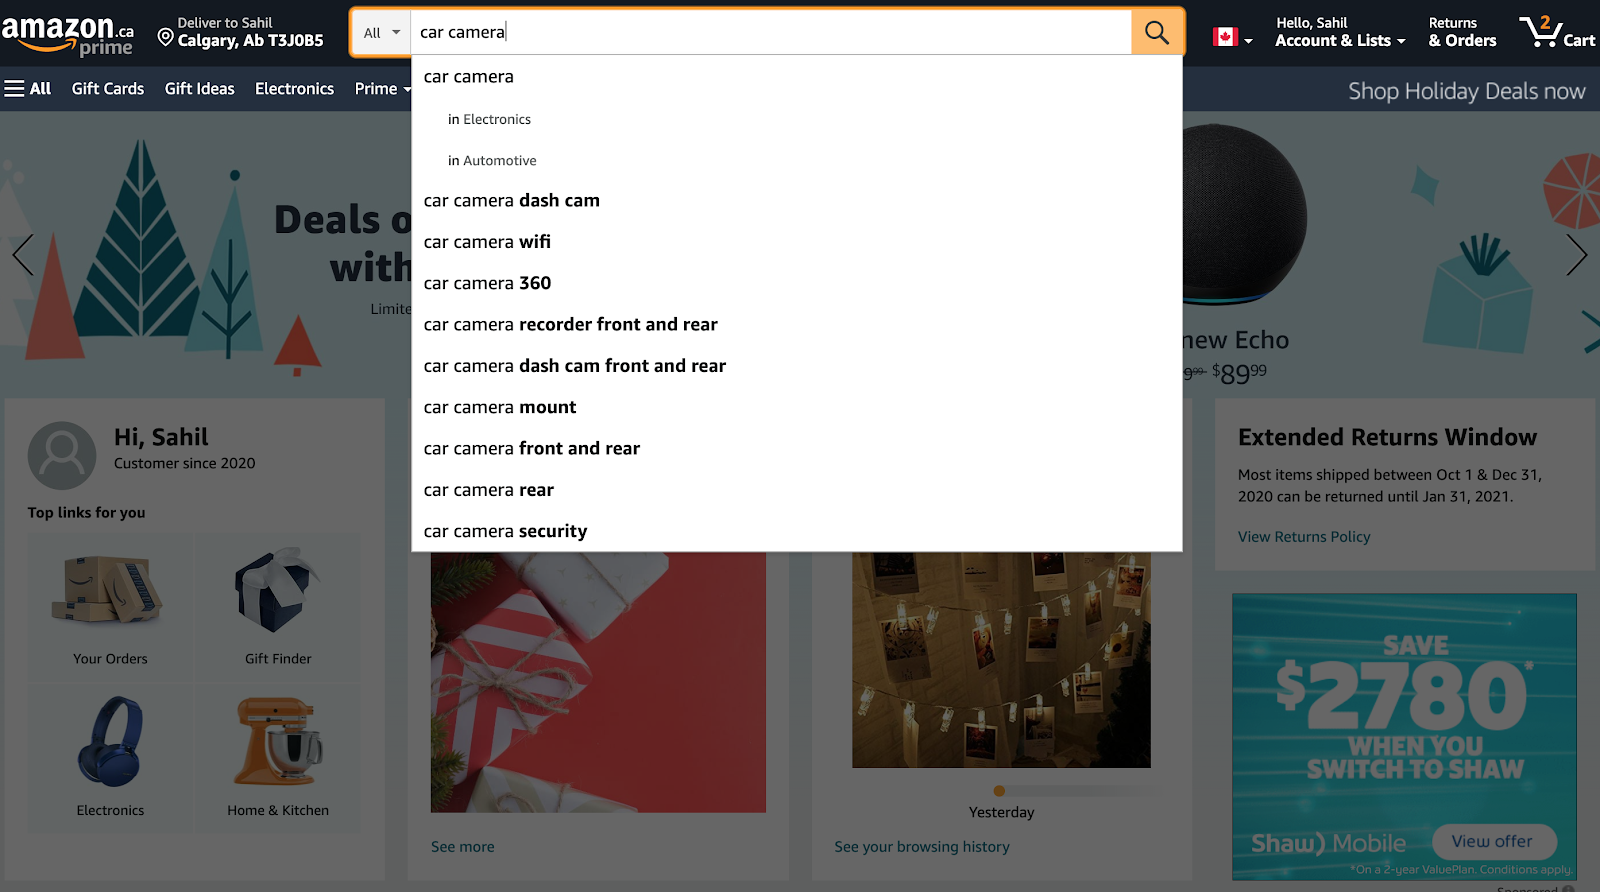
- Enter a product that you sell in your Shopify store or a keyword that is relevant to one of your products (ex. “Car camera”) in the Amazon search bar.
- Take a look at the search suggestions and make note of the different keywords (ex. “Car camera dashcam”, “car camera 360”, “car camera front and rear”, “car camera wifi”). This will give you keyword ideas for your Shopify store.
- Take a look at the product category names (ex. “Electronics” & “Automotive”) and make note of category ideas for your store.
- Now you’re ready to use this information to dive deeper into your keyword research!
Keyword Research with Google Keyword Planner & SEMrush
Now that you’ve got some ideas on where to start, it’s time to dig deeper by using the Google Keyword Planner & SEMrush tools. Although SEMrush offers several paid options, there is also a free plan available to help you with some basic keyword research.
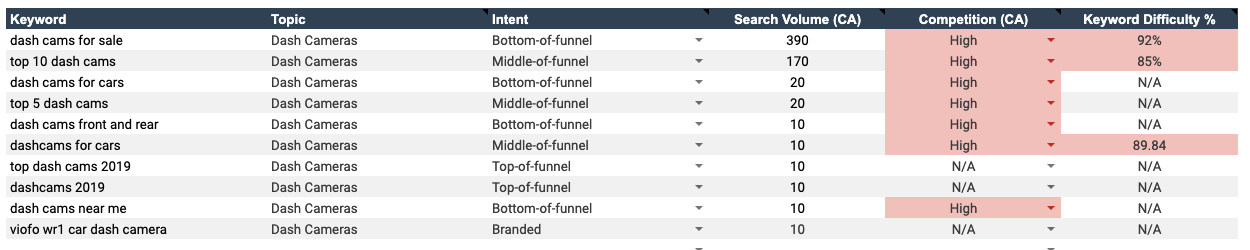
Before you start entering keywords into Google Keyword Planner, create a spreadsheet to gather and compare information during your keyword research process. This should include columns for keywords, search volume, competition, and keyword difficulty. Check out the image below for an example of what your spreadsheet might look like. This is just a small example for one product. Feel free to expand this document per your store inventory and services.
Here’s a quick rundown of the terminology to help you through this process:
Topic: This is the category the keyword fits into best in relation to your website. If your website offers various services or products, each service offering or product category would qualify as its own topic. Assigning keywords to a topic helps identify its relevance to your website and helps in the keyword mapping process. As our keyword research in this example only focuses on one product, all the topics should be the same. Otherwise, the keyword would likely be irrelevant!
Intent: This is the level of the funnel the search takes place. Top-of-funnel is problem awareness searches, middle-of-funnel is solution awareness searches, and bottom-of-funnel searches are directly related to your brand or product.
Search Volume: Monthly Average Search Volume defines the average number of monthly searches for the keyword. This information may vary based on date range, location, and language.
Competition: This defines how difficult it would be to rank for a particular keyword. The level of competition (low, medium, or high) is determined by the number of competitors vying for a keyword relative to all keywords across Google.
Keyword Difficulty %: The keyword difficulty index (from 1 to 100%) shows you how difficult it would be to outrank your competitors in the Google organic top 20 for a given keyword. The higher the percentage, the harder it will be to achieve high rankings for each targeted keyword.
For your Shopify store, you’re ideally looking for keywords with bottom-of-funnel intent (commercial keywords), relatively high search volume, relatively low competition, and relatively low keyword difficulty.
So, you’ve got your research document ready. What’s next?
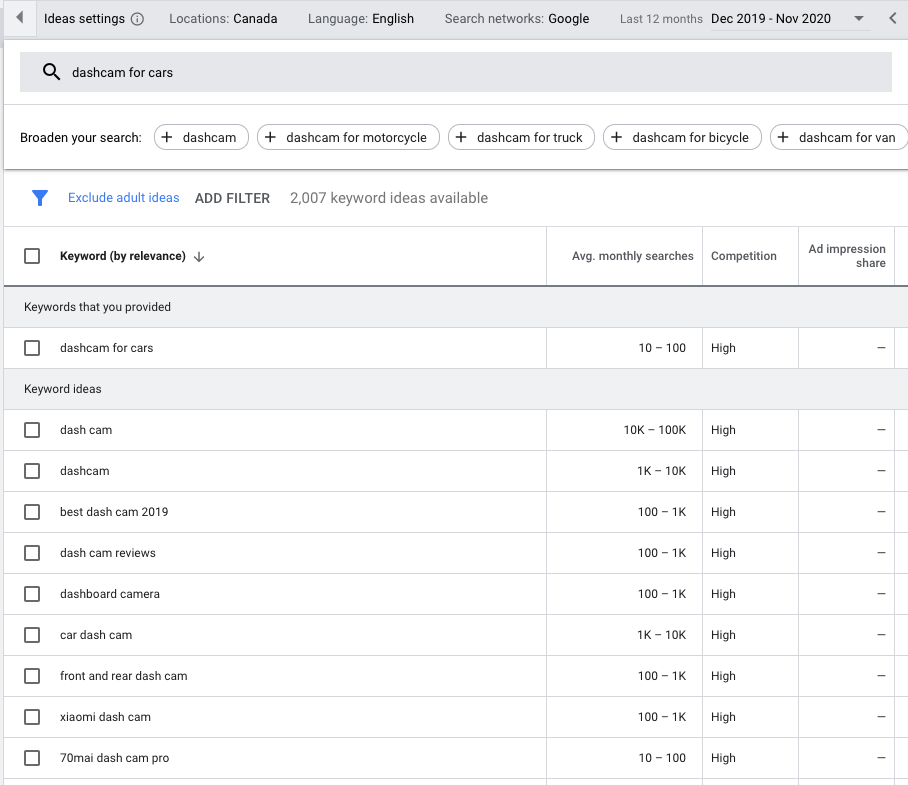
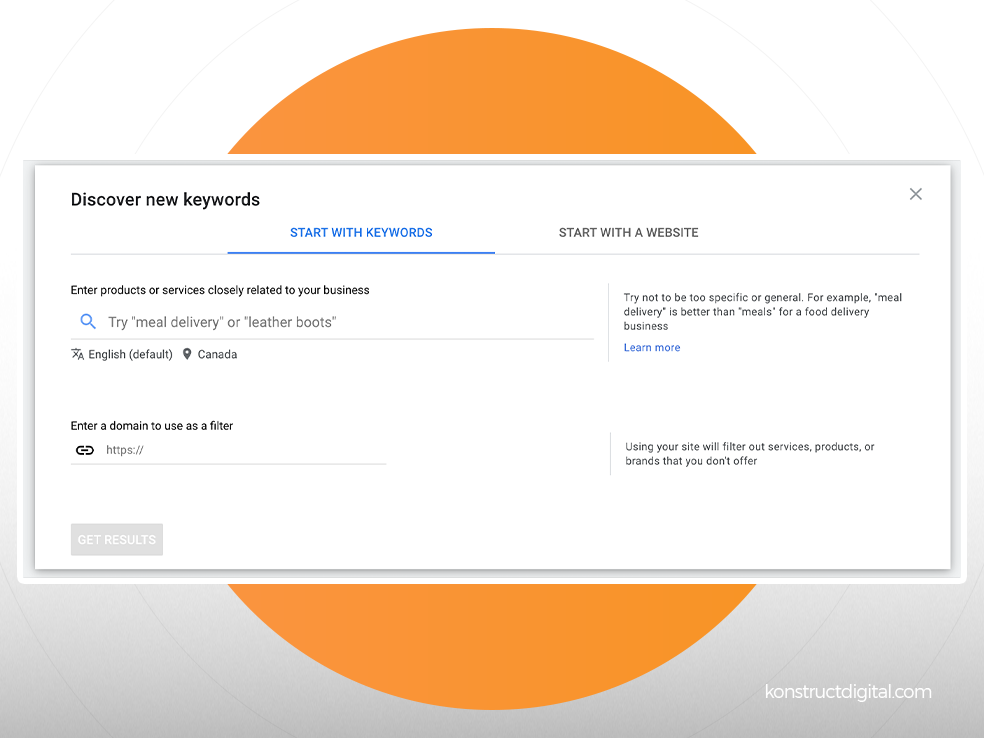
Now’s a good time to plug in those keywords that you discovered from your Amazon search suggestions research! Once you enter a keyword into the Google Keyword Planner tool, make note of the search volume and competition on your spreadsheet. This tool will also give you ideas on relevant keywords that could be effective for your Shopify store. Be sure to add these new keywords to your spreadsheet as well!
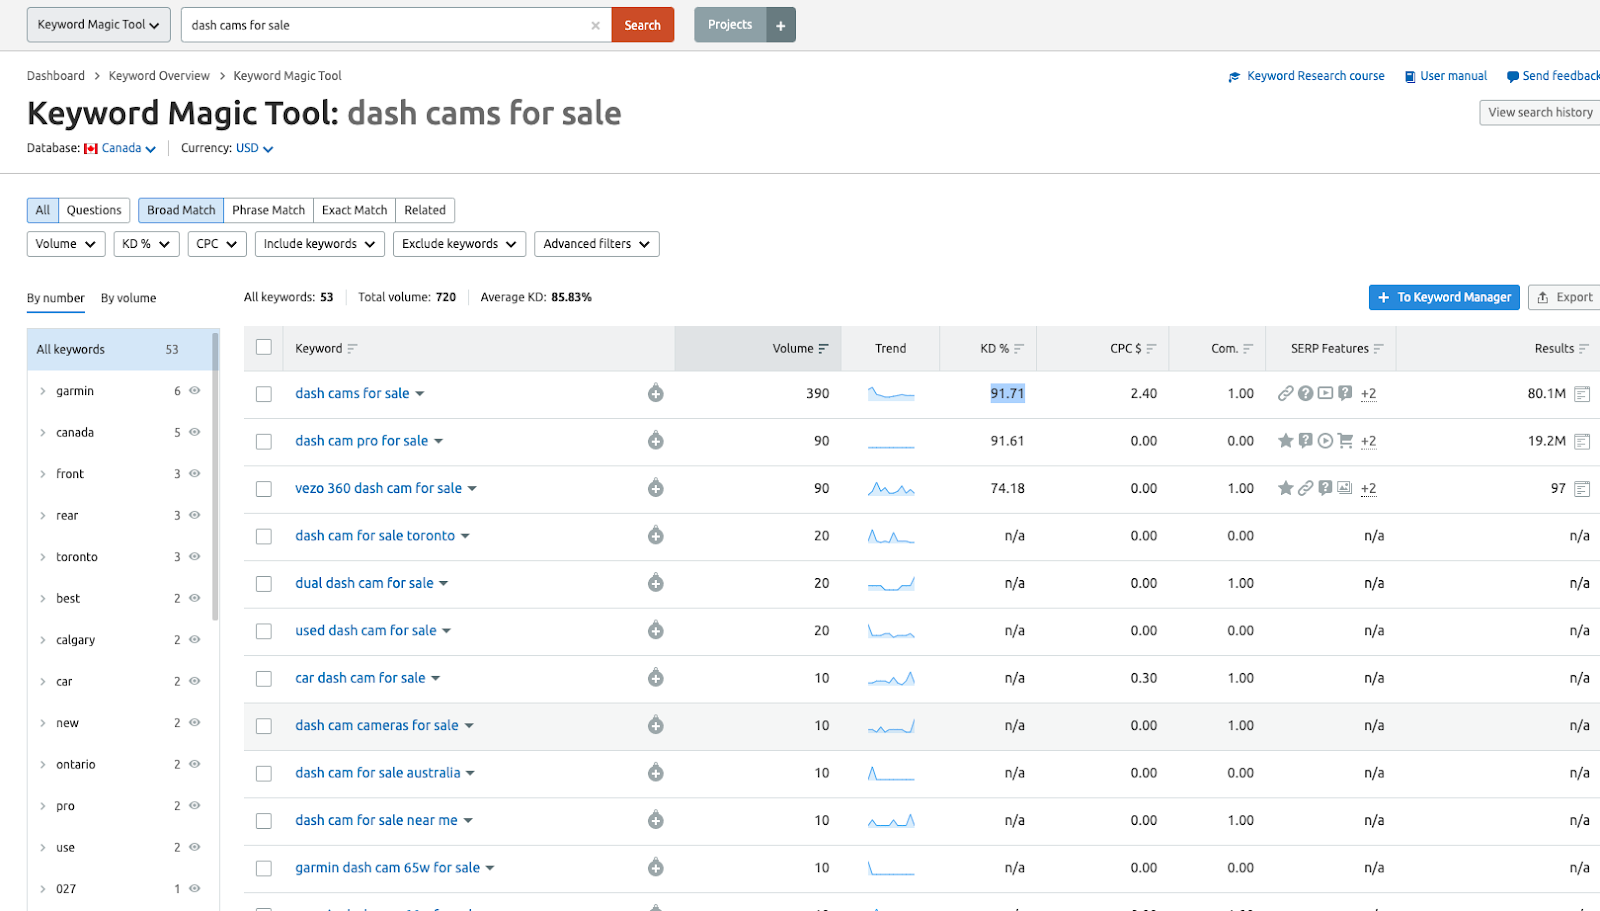
To determine keyword difficulty, we’re going to head over to SEMrush. You’re going to pull up the Keyword Magic Tool, enter your keyword in the search bar, and make note of the number in the KD% column.
Now you’ve got a thorough list of keywords to compare based on various factors so you can choose the best keywords for your Shopify store!
2. Optimize your Shopify Website Architecture
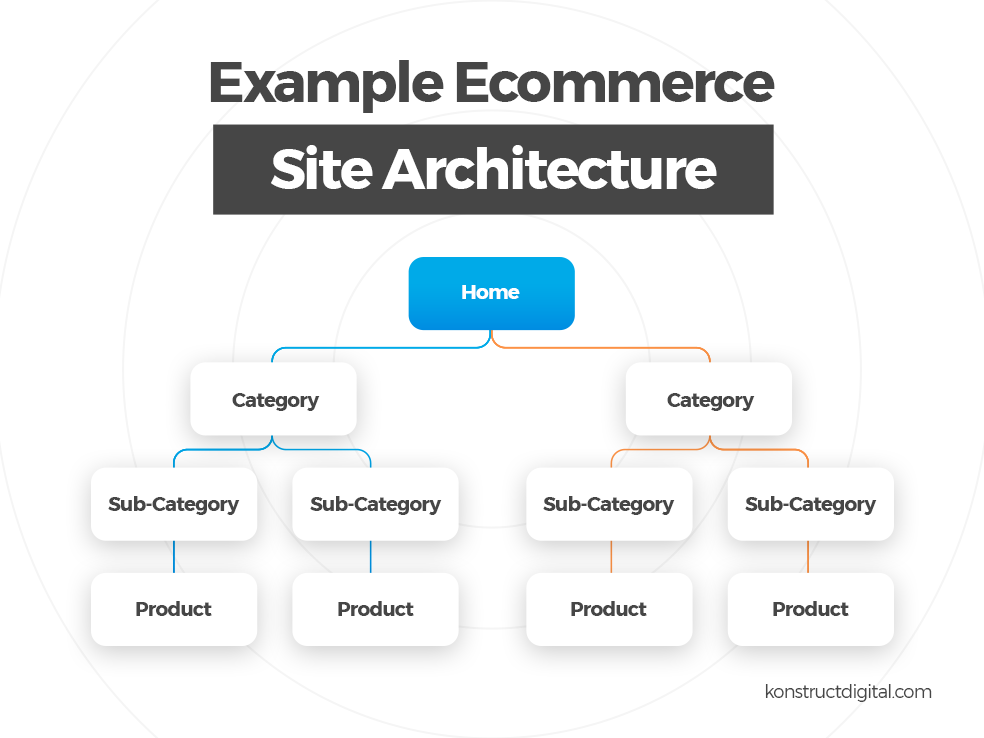
Compared to a standard website, eCommerce websites tend to be much more complex with a lot more pages, which can make the user experience rather complicated. This is where solid website architecture comes in to save the day.
Site architecture refers to the way in which the pages on your site are organized and arranged. This is important for EVERY website, but especially eCommerce sites to ensure that users and search engines can easily find the many different pages on your site.
Having a solid site architecture is important both for user experience and SEO. Users are more likely to make a purchase from a site that is easy to navigate, and search engines are more likely to rank pages higher when they can easily understand the structure of a site.
Long story short: you want your e-commerce website to be simple and scalable. Why?
Simple – to help users and search engines navigate.
Scalable – to help you easily add more inventory and grow your business.
Here’s an example of what an ideal e-commerce site architecture would look like:
Using Shopify to Optimize Your Site Architecture
Let’s dig into the Shopify settings to see how you can use Shopify to properly organize and arrange your site.
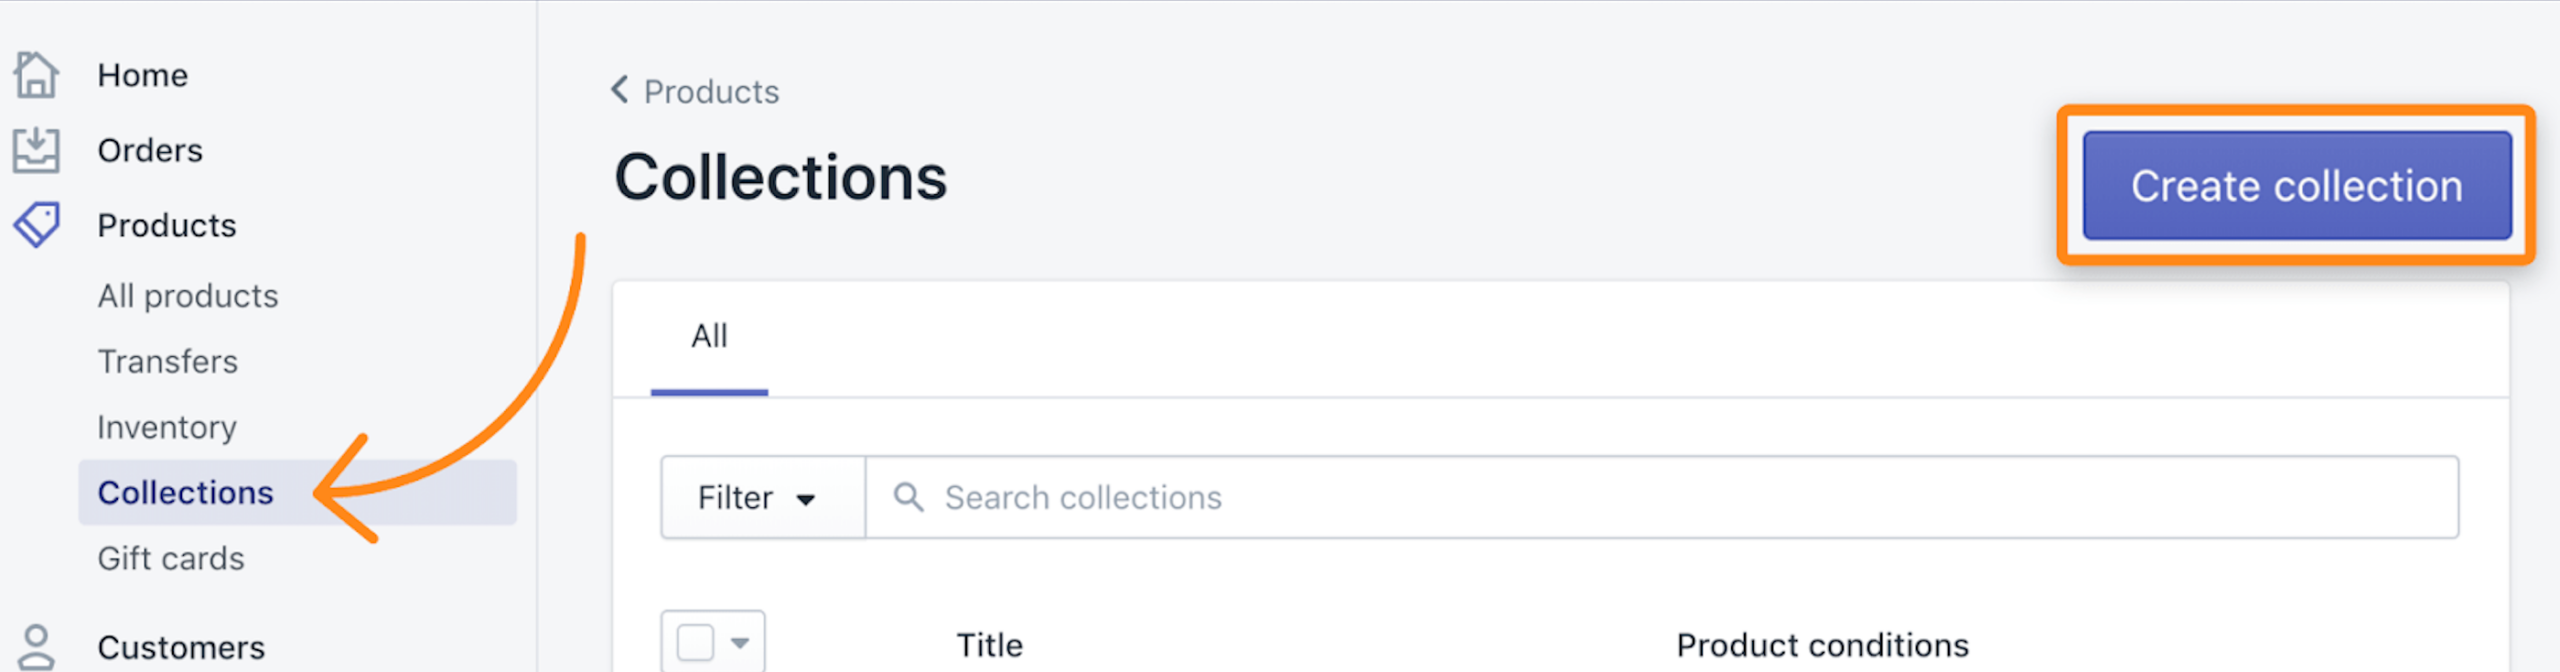
When you log in to your store, you will see a left sidebar menu with a “Products” section. Let’s say you sell car accessories and want to add a new 360-car camera to your Shopify store. If you’ve never sold car electronics before, you would need to start by creating a new category. In Shopify, category pages are referred to as “collections”. Collections could also be used to group together products that are part of a special discount or promotion such as “buy one, get one” promotions. You can add a new collection page by clicking Products > Collections > Create Collection.
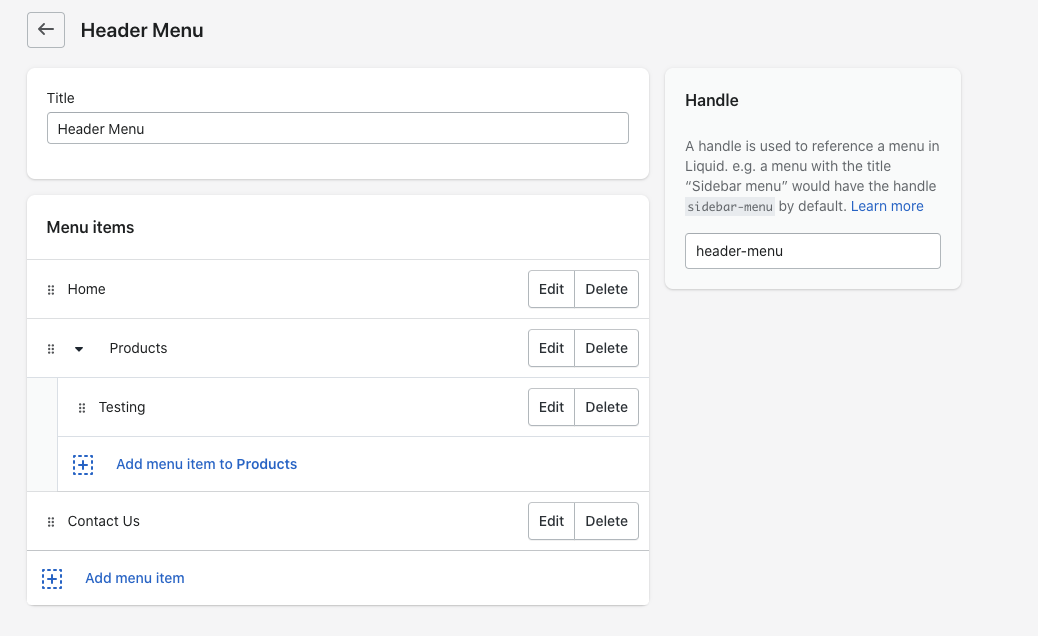
To create a sub-category page, you’ll have to create a “collection” page and nest it within a hierarchy in the menu. Shopify does not differentiate between category and subcategory pages.
Once you have your collection, you can go ahead and create the product page for your 360-car camera. You can add this page by clicking Products > All Products > Add Product.

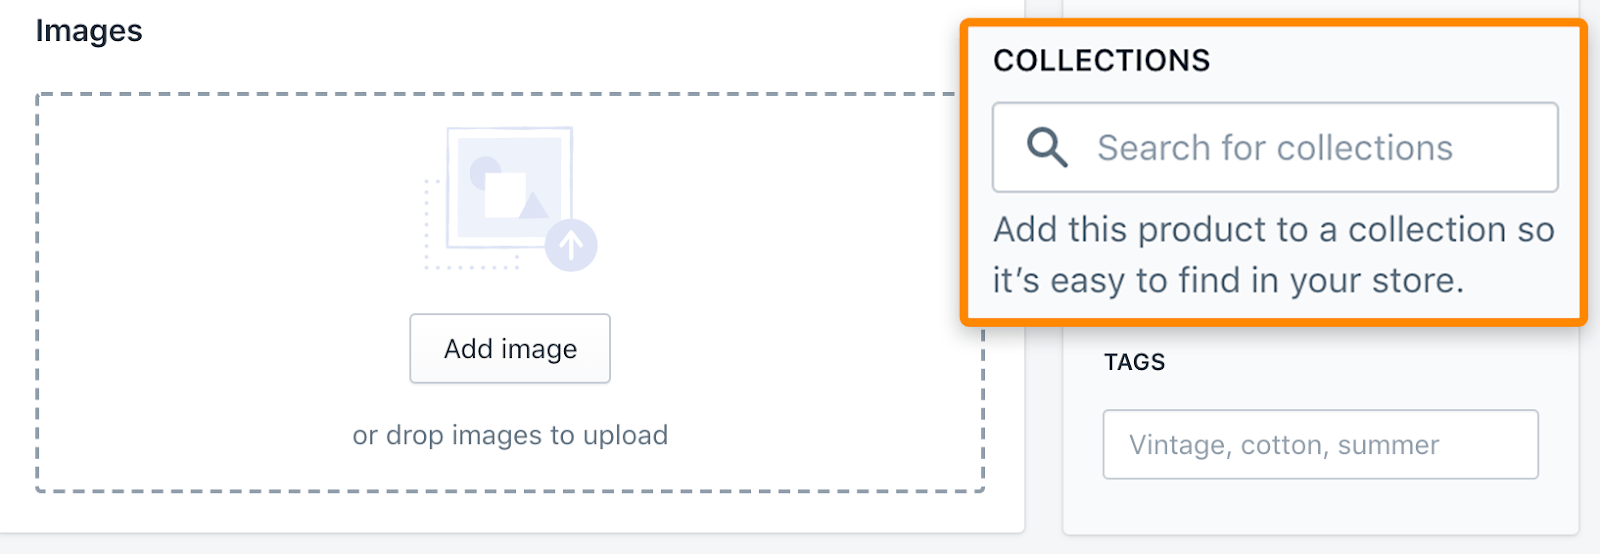
When creating a product page for your 360 car camera, be sure to add it to your new “electronics” collection.
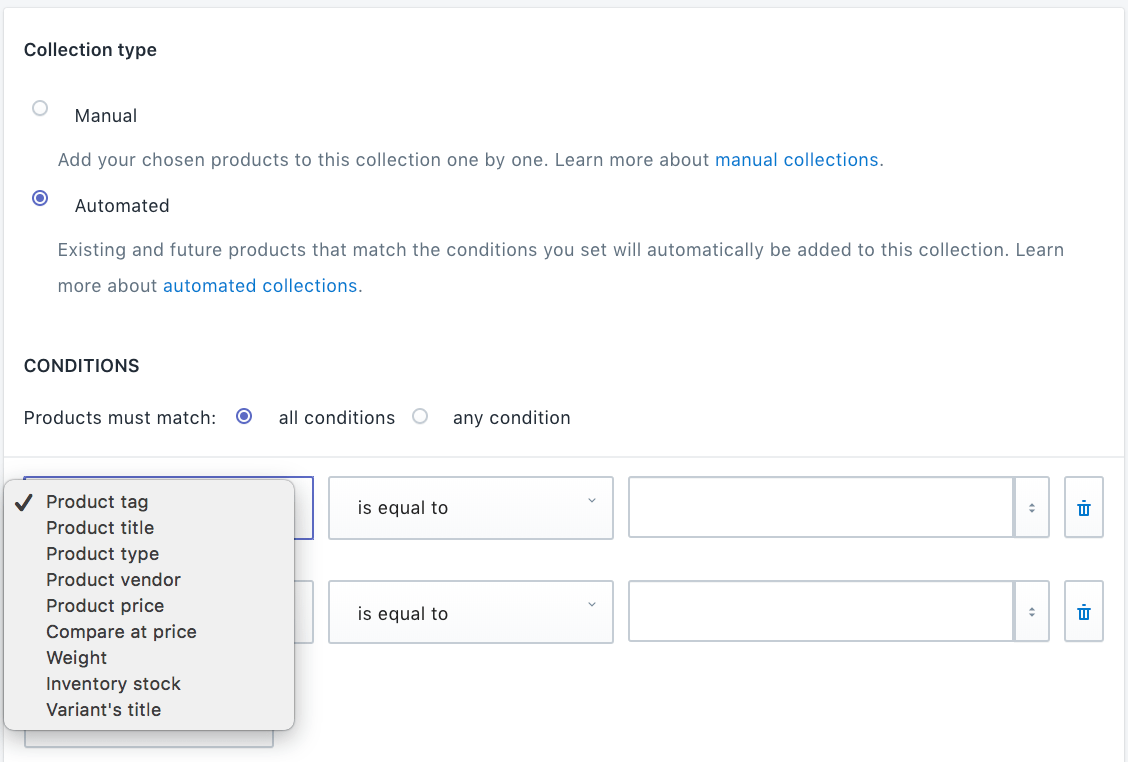
Note: If you have lots of products, you may wish to use the automated collection option rather than the manual collection option. Choosing the automated collection option will help you save time and will streamline the process of adding new products to your Shopify store!
When setting up your automated collections, you will need to create product conditions (basically product tags) to help Shopify identify which products belong in the collection. These include conditions such as type, price, vendor, and stock. For example, this would help you create collections based on different price levels (ex. Products under $30) or brands.
To add these collections to your main menu, click Online store > Navigation> Add menu item.
Don’t forget that there are additional pages other than product and category pages that are important to add to your site to build trust and credibility with your customers. These pages may include an “About Us” page, a “Contact Us”, privacy policies, etc.
Additionally, I would highly recommend adding a search box on your website. This will allow you to use visitor search terms to map with your keyword research document for later use!
3. Complete On-Page SEO for Your Shopify Website
Now that you have your Shopify store website architecture ready and basic keyword research complete, we can take the next steps to optimize these pages.
Let’s focus on your product and category pages. These are the highest-value pages on your site and have the greatest impact on your sales.
Through Shopify, editing on-page SEO such as page titles, meta descriptions, and URLs is pretty easy. Simply select a product or collection page, scroll down to “search engine listing preview”, and click “edit website SEO”
Page Titles
When it comes to page titles, the main goal is to achieve the best click-through rate (CTR) possible. Higher CTR = more traffic = more sales!
Here are the elements of an effective eCommerce page title:
- Title includes target keyword. Hopefully, this should go without saying! It’s also a best practice to add the keyword to the beginning of your page title (if possible).
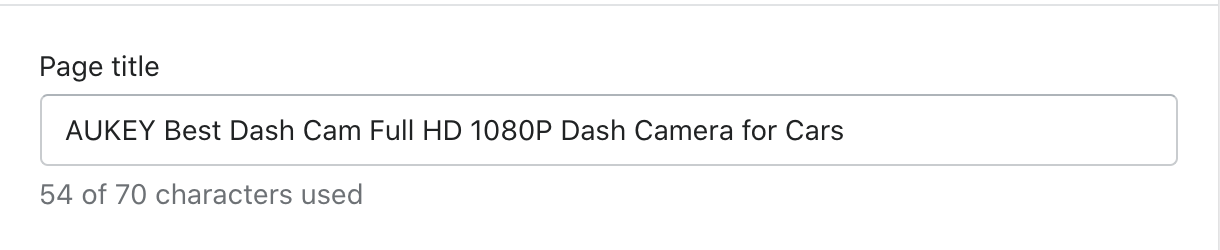
- Length is between 51-60 characters. Longer titles are likely to cut off and shorter titles lack description.
- Title includes “click magnet” words such as “Free Shipping”, “Lowest Price” or “X% off”. These will make your title more appealing to searchers and will boost your CTR. For example, “25% off on AUKEY Full HD 1080P Dash Camera – Free Shipping”

- Title includes modifiers such as “Best”, “Buy”, and “Deals”. These are words that your target audience might add when searching for your products. For example, instead of simply “Dash Cam for Cars” you could change your page title to “AUKEY Best Dash Cam Full HD 1080P Dash Camera for Cars”.
Note: You can use Google Keyword Planner to determine the best modifier to use by searching and comparing various long-tail keywords.
Meta or Page Description
Now, let’s move to the next step and write the meta descriptions for your product and category pages.
A good description should not only entice potential customers to click on your listing and complete a purchase, but also help search engines understand your product, which can help boost your SERP ranking.
Here are a few important elements of an effective meta-description:
- Description includes target keyword. Exact match keyword usage is less important in your meta description than in your page title. Include your keyword when it is appropriate but focus more on the quality of your description.
- Length is under 320 characters. Shopify allows you to use up to 320 characters in your description. However, meta descriptions on the SERP typically cut off after 160 characters and mobile SERPs cut off after 120 characters. If you’re going to use a longer description, ensure that the most important information is included in the first 120 characters.
- Description is unique and engaging. Use this opportunity to capture your audience’s attention and entice them to click through and buy your products. If you’re selling third-party products, avoid copying and pasting the descriptions from the manufacturer. Instead, create your own unique description that aligns with your brand.

Page URL
For eCommerce websites, it’s possible that your URLs will be much longer compared to other websites. However, it’s still important to keep them as short and sweet as possible and focus on keyword richness.
Here’s how to write an seo-friendly and keyword-rich URL for the various page types:
For category pages, include a 1-2 word description of that category:
Example: https://yourdomain.com/dashcam
Follow the same process for subcategories. Only this time, the subcategory will come after the category in the URL:
Example: https://yourdomain.com/dashcam/cars
Then, for product pages, include just your target keyword for that product, separated by dashes (“-”).
Example: https://yourdomain.com/dashcam/cars/viofo-wr1/
Optimize Images
Images are one of the most important SEO elements to help drive traffic to your eCommerce site. Optimizing your images is also pretty simple to do, so ensure that you don’t miss out on this easy opportunity to improve your on-page SEO.
Image optimization involves adding relevant alt text to your images. Alt text appears in place of an image if an image fails to load, helps screen-reading tools describe images to the visually-impaired, and allows search engines to better crawl your website, therefore boosting your search rankings. This text should briefly describe the contents of your images.
To add alt text to your images in Shopify, upload an image> click “…”> click “edit alt text”
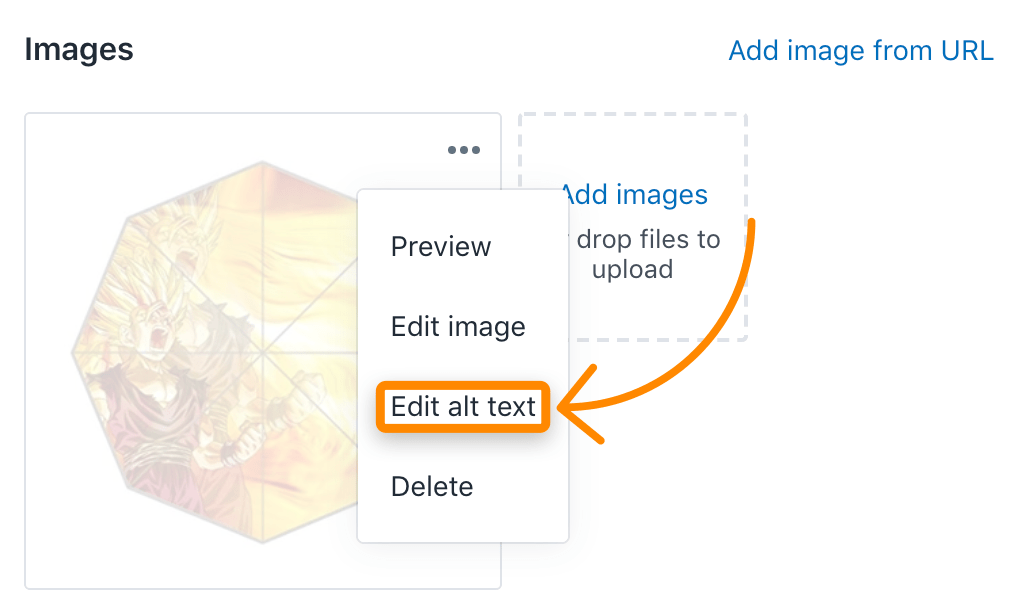
Keep in mind that your alt text should be useful content. While it’s considered a best practice to include appropriate keywords that are relevant to your page content, keyword stuffing that negatively affects user experience could result in your site being flagged as spam. Limit your alt text to just a few targeted keywords for the best results.
Internal Linking
Internal linking refers to the act of adding a link from “Page A” to another “Page B” on your site. This is useful because it can pass some of the SEO value of one page to another and increase user engagement by making it easier for them to find relevant content on your site.
Luckily for Shopify merchants, internal linking is done practically automatically when you set up your site’s navigation. You can also use an app called AutoLink to help with your automatic internal linking. The app allows you to create internal links automatically for selected keywords in your product descriptions or pages.
However, it’s still a good idea to spend some time on strategic internal linking, specifically from authoritative pages to high-priority product and collection pages. For example, if you published a blog post that generated a lot of backlinks, it would be a good idea to add a keyword-rich anchor text from the blog post to one of your relatively high-ranking product pages to give it a potential extra search ranking boost.
4. Technical SEO for Shopify Website
Now we’re ready to move on to the technical aspects of your Shopify site that can be optimized to improve your search rankings.
Basic Setup
Before we cover how to build a technical SEO foundation, we must first ensure that you have a basic setup to gather the necessary data.
- Google Analytics: This will be used to track and report your website traffic data. If you don’t already have this set up for your Shopify store, Shopify has a guide on how to set up Google Analytics within Shopify.
- Google Tag Manager: Use this tool if you plan to integrate more tracking codes and third party apps.
- Google Search Console: This service allows webmasters to keep track of site performance, check indexing status, and optimize website visibility. Here’s a guide on how to verify your store in Google Search Console.
URLs
We have already discussed website architecture and setting up URL structure in the “Optimize Your Shopify Website Architecture” section above. In this section, we’ll go into more detail about the different types of URLs.
Shopify’s URL structure is quite rigid, and there’s not a lot you can do to change it. The only modifications you can make are to URL slugs – that is, the last portions of URLs. Before we jump into explaining different URL types, let’s first see how people can reach your domain.
Domain Canonicalization
Domain canonicalization is the process of choosing a preferred way to reach your domain and explicitly communicating this preferred way.
In theory, there are four different ways that someone could reach your website’s homepage:
- http://yourdomain.com
- http://www.yourdomain.com
- https://yourdomain.com
- https://www.yourdomain.com
Can you spot the difference? Your homepage can be accessed with or without the ‘www’ subdomain and through either ‘HTTP’ or ‘HTTPS’.
Additionally, your Shopify store can also be accessed through yourdomain.myshopify.com. That’s a lot of different ways to reach your website’s homepage!
The main goal of website canonicalization is to avoid duplicate content dilution of your website’s link equity. You want your website to be accessed through a singular URL which can be achieved by redirecting all others to your preferred URL.
If you don’t already have your third-party domain connected to your Shopify store, you can use this Shopify guide on how to connect your custom URL.
Once your domain is connected, follow these steps to set up domain canonicalization in Shopify:
- Log on to your Shopify admin console
- Go to Online Store > Domains
- If it says, “Traffic from your domains is not being redirected to this primary domain”, click the blue “Enable Redirection” link
- Verify that your domains are now being redirected to your primary domain by going back to Online Store > Domains
- You should see a message that says, “Traffic from all your domains redirects to this primary domain”.
Now we’re ready to discuss different URL types!
Collection URLs
As we discussed earlier, product categories are called “collections” in Shopify. Collections have the following default URL structure, but you can define collection names yourself: https://yourdomain.com/collections/$collectionName
So, if you have a collection called “car cameras”, the collection URL would be: https://yourdomain.com/collections/car-cameras.
Tag URLs
Besides grouping products in collections, you can also tag related products. For instance, you may want to tag all car cameras with wifi. You can then use the following tag URL to find all the cameras with wifi: https://yourdomain.com/collections/car-cameras/wifi
Product URLs
Product URLs will have the following default structure: https://yourdomain.com/products/$productName
Similar to collections, you can change the URL slug for product pages but not the path leading to it.
This means that a product named “viofo wr1 car dash cam” will have this URL: https://yourdomain.com/products/viofo-wr1-car-dash-cam
Now we have a problem where your product is available under multiple different URLs. Uh oh! The “viofo wr1 car dash cam” is available under: https://yourdomain.com/collections/car-cameras/products/viofo-wr1-car-dash-cam, which is canonicalized to: https://yourdomain.com/products/viofo-wr1-car-dash-cam.
This situation is not ideal because it sends the wrong signals to search engines for crawling the collection URL and then canonicalizing the product URL. Link authority is also not passed to other product pages, which need higher search rankings.
So, how do you fix this problem?
You need to stop Shopify from linking to the product URL that’s canonicalized. Here are the steps to do this:
- Log on to the Shopify admin console
- Go to Online Store > Themes
- Click the Actions drop-down menu and select ‘Edit code’
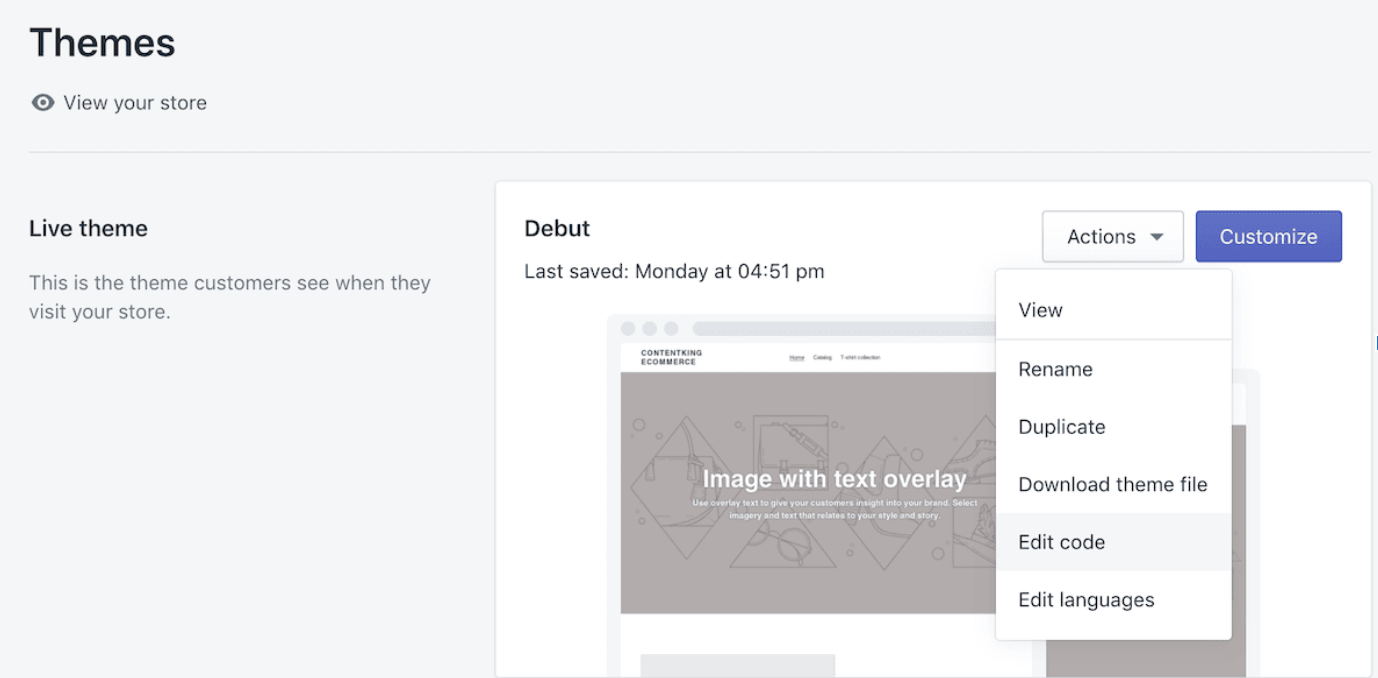
- In the Snippets folder, select ‘product-grid-item.liquid’
- Replace <a href=”{{ product.url | within: current_collection}}”class=”product-grid- item”> with <a href=”{{ product.url }}” class=”product-grid-item”>
Product Variants
What if our product “viofo wr1 car dash cam” is available with different variants? For example, “white viofo wr1 car dash cam” or “grey viofo wr1 car dash cam”.
If you define product variants in Shopify, the platform automatically adds a ?variant=$id to the end of the URL. This means that the grey version of our car camera would be available through the following URL: https://yourdomain.com/products/viofo-wr1-car-dashcam?variant=123456789
Unfortunately, this URL is canonicalized to the main product. This means that search engines will not index and rank this product variant page. If you find that your visitors are specifically searching for product variants, it would be a good idea to create separate product pages for each variant rather than product variants.
Page URLs
In addition to collection, product, and category pages, your Shopify site will also have pages like “About Us” or “Contact Us”.
These pages will have the following URL structure: https://yourdomain.com/pages/$pageName
This means that your “About Us” will have the following URL: https://yourdomain.com/pages/about-us
Blog URLs
Finally, we have blog URLs. Even if you don’t have any blog articles yet, Shopify creates a blog overview page for you by default at: https://yourdomain.com/blogs/news
Your blog article URLs have the following URL structure: https://yourdomain.com/blogs/news/$articleName.
For example, a blog article named “how to install car camera” will have the following URL: https://yourdomain.com/blogs/news/how-to-install-car-camera
How to Manage Shopify Website URL Redirects
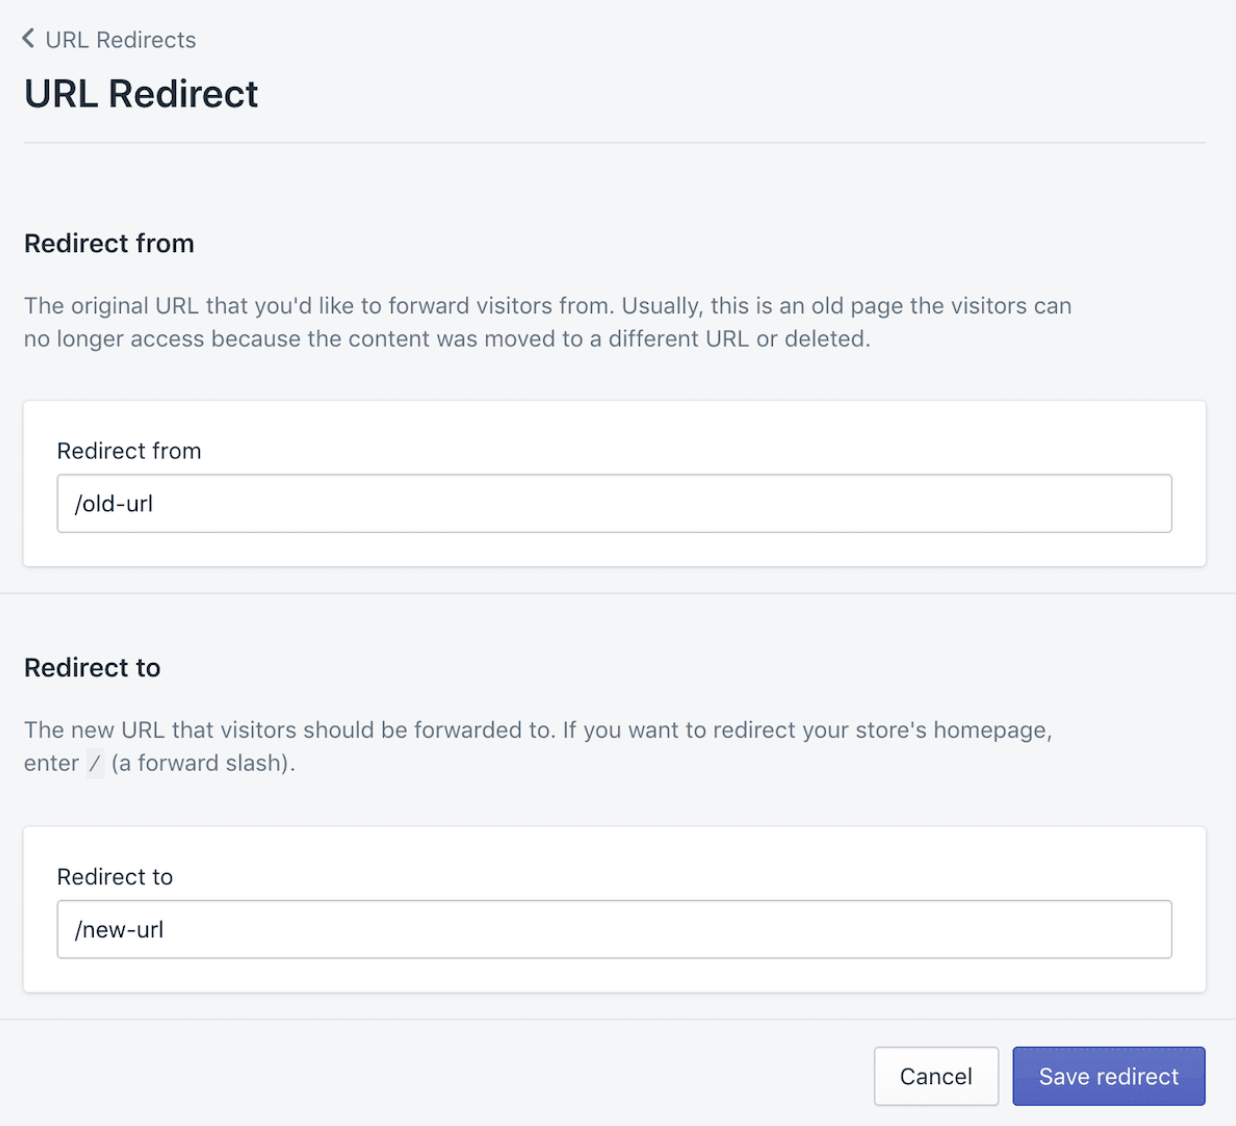
When you manipulate URLs, Shopify will ask you if you want to create a 301 redirect. We highly recommend creating 301 redirects if your store is already live. The Shopify redirect manager is a cool feature for importing and exporting redirects to or from Shopify.
Here is the step-by-step process for managing redirects in Shopify:
- Log on to the Shopify admin console
- Click Online Store > Navigation > URL Redirects
- Click the ‘Create URL redirect’ button
- Define the redirect source URL in the ‘Redirect from’ field and the redirect target in the ‘Redirect to’ feld
How to Manage Crawling and Indexing for Shopify Website
SEO is like a language you can use to communicate with search engines. In the previous sections, we discussed the set-up of URLs and redirects so you don’t miss any opportunities for search engines to reach (or communicate with) your website.
Communication is a two-way street. That’s why the next step is to ensure that your website can reach (or communicate with) search engines. This is where crawling and indexing comes into play.
Let’s start with the technical aspects that help search engines crawl your website more easily and effectively.
Meta Robots Tags
Meta robots tags provide instructions to search engines on what pages should or should not be indexed in search engines. You can find meta robots tags in the HTML source of a page and it will look something like this: <meta name=”robots” content=”noindex,follow” />
You may choose not to index pages that add no value from an SEO perspective, For example, this might include landing pages that you’ve set up specifically for PPC if they contain highly similar information to other pages that are already indexed on your site.
On Shopify, there are two ways to stop search engines from indexing a page:
- Make changes to your code.
- Use an app that adds a functionality to define these directives within Shopify’s admin console.
Option 1 is riskier and less scalable. However, if you do choose to make the code changes yourself, Shopify has a document that can help you with hiding a page from search engines. Personally, I recommend going for the second option because it is a much more user-friendly approach.
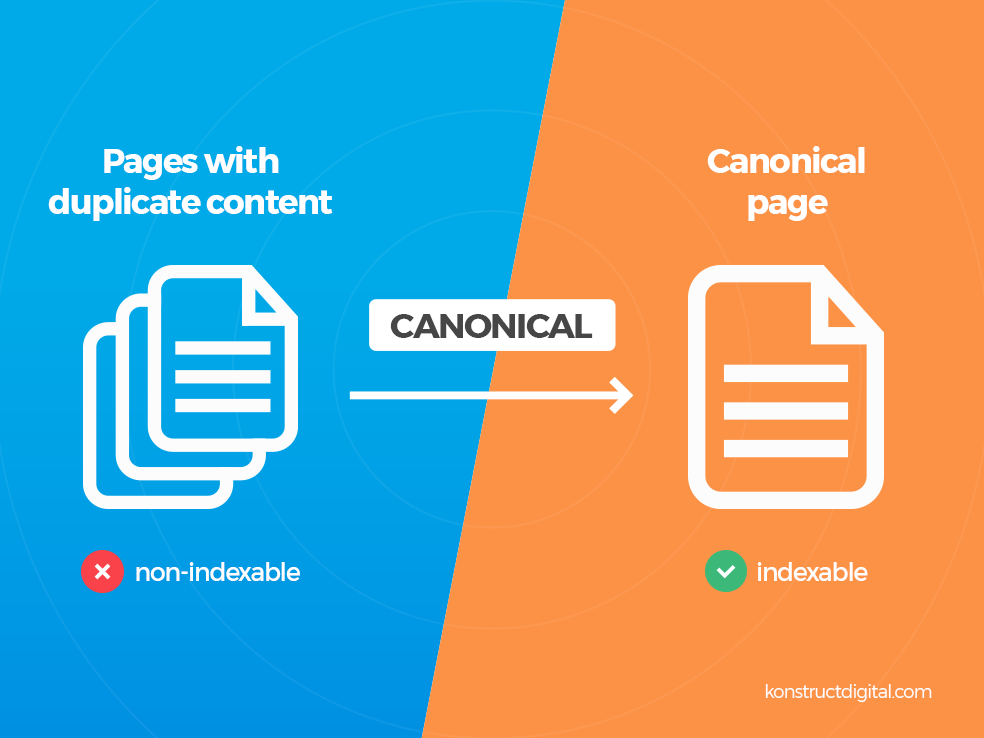
Canonicals
E-commerce websites can often have multiple versions of one page. In that case, canonical urls are used to tell search engines to consider only one version of a page for ranking purposes. Search engines will assign the relevancy and authority from the other version to the canonical version.
In Shopify, there’s no need to worry about duplicate content for URLs that contain parameters. Shopify always includes a self-referencing canonical to the URL without parameters. For example, if you use the link https://yourdomain.com/collections/cameras for posting on facebook, it will add ?fbclid=XXXXXX to the end of the URL when users click on the link. However, the self-referencing canonical will point to the URL variant without the parameters.
If you want to play around more with your canonical preferences in Shopify, you can edit your theme’s code. Shopify has a helpful guide to help you learn more about editing the canonical within shopify.
Pagination Attributes
Page attributes provide signals to search engines regarding the content spread across a series of pages. The syntax for pagination attributes looks like this: rel=”next” and rel=”prev”
Most Shopify themes support pagination attributes, so this is one less thing you have to worry about!
Robot.txt
Robot.txt is the file that contains the rules for crawlers and provides information about what they can and cannot access. Shopify comes with a default robot.txt for every store that is automatically generated and maintained. This means that you cannot manually change your robot.txt through Shopify.
The following photo shows the beginning of a robot.txt for a Shopify store:
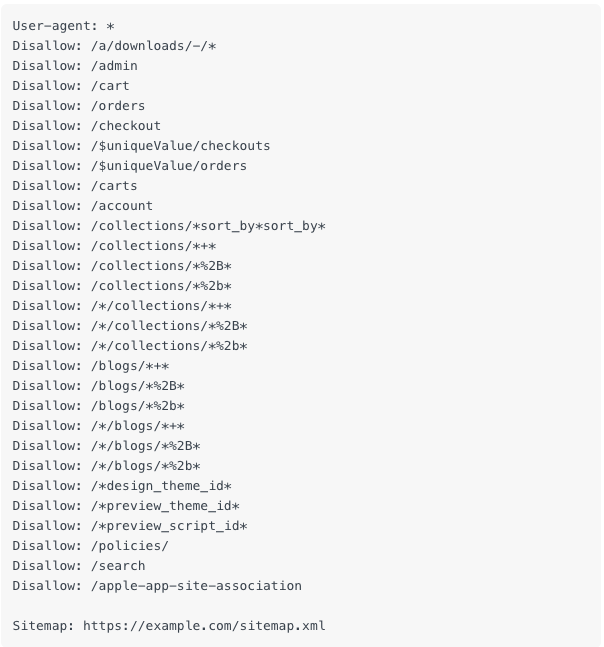
As you can see from the photo, Shopify prevents search engines from accessing account pages, checkout pages, cart pages, internal search results pages, and a few more that could result in duplicate content issues. The photo also shows the sitemap in the robot.txt, which we will cover in the following section.
XML Sitemaps
An XML sitemap is a document created automatically by Shopify that tells search engines which content on the website should be crawled and indexed. Although search engines will look for the XML sitemap within the robot.txt file, we recommend submitting this file through Google Search Console and Bing Webmaster Tools.
The following photo shows what a XML sitemap looks like:
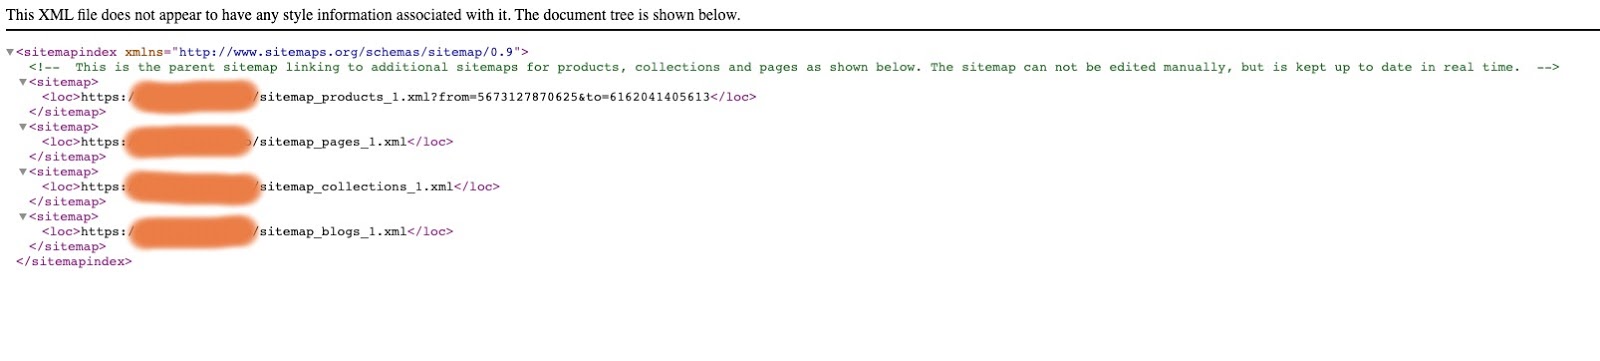
If you want to go deeper and control what’s included in the sitemap generated by shopify, you can use app integration like Smart SEO.
Structured Data
Structured data is data organized in a predefined format. One of the important types of structured data to note is schema. Schema markup, found at schema.org, is a kind of metadata that creates an enhanced description (AKA a rich snippet) once added to a webpage. This helps search engines understand the webpage content and provide context to your page on the SERP.
Although there is no guarantee that Google will display rich snippets, using proper schema markup will boost SEO and increase the probability of search engines ranking your pages highly.
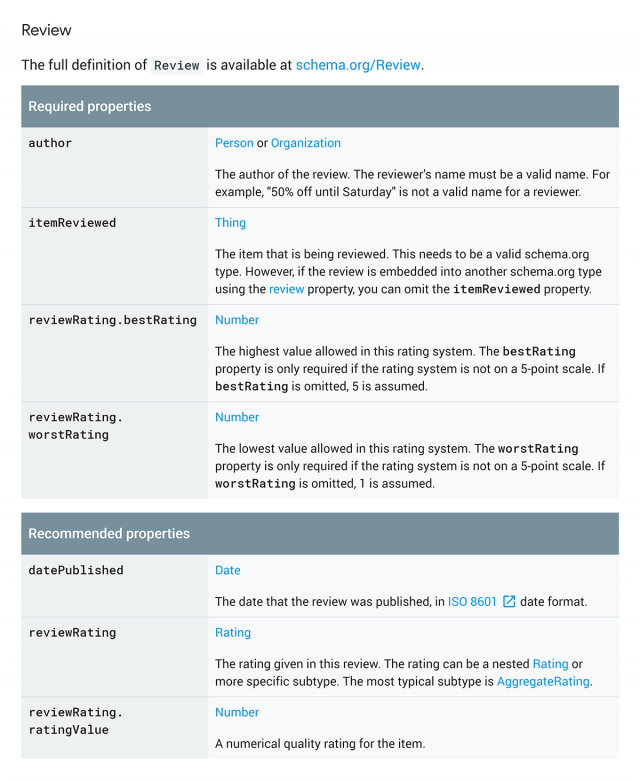
The following schema types are useful to Shopify stores:
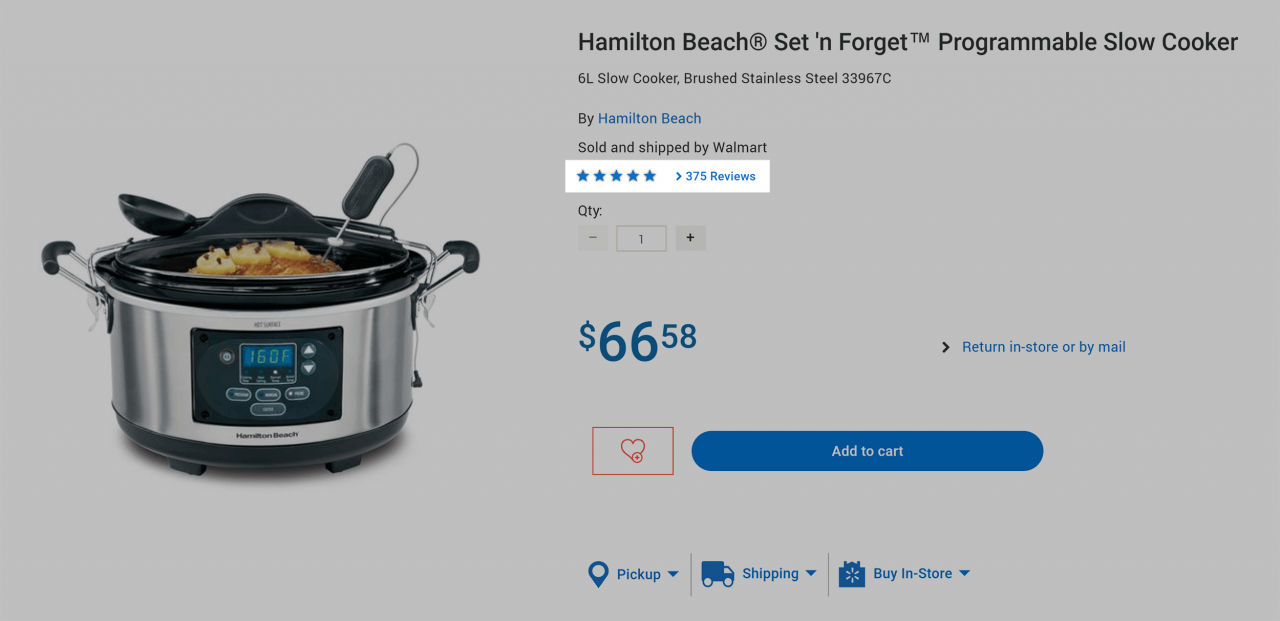
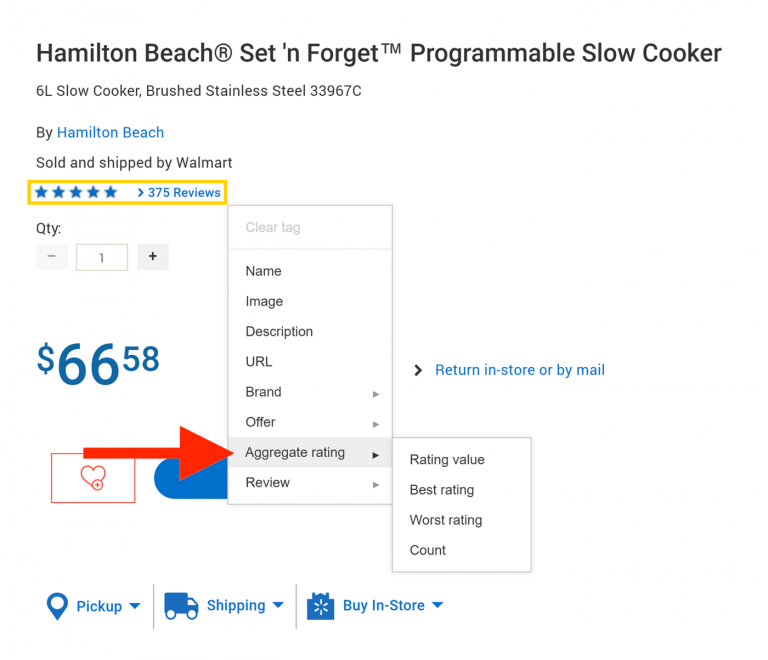
Let’s use the example of creating and implementing product review schema. This photo shows the types of markup specific to reviews:
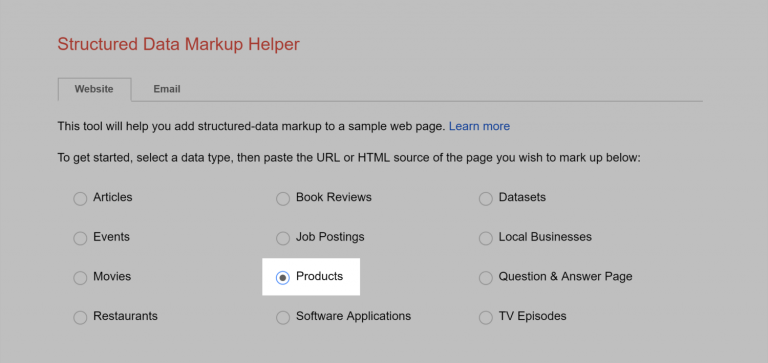
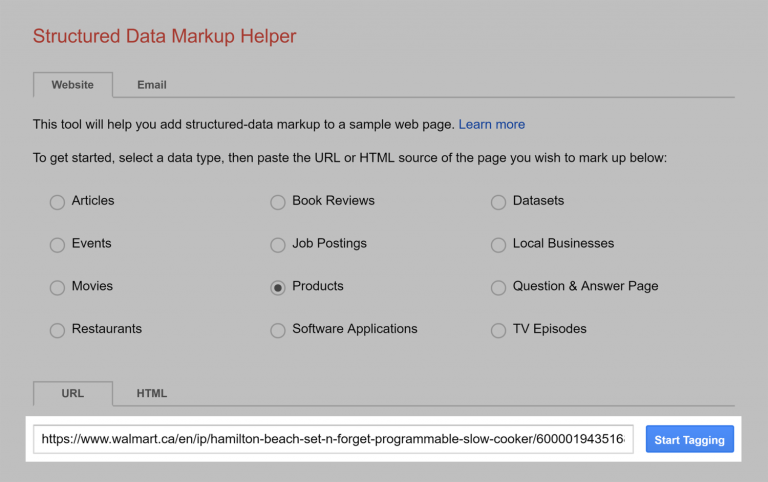
Structured Data Markup Helper is a helpful tool to set up schema markup. Here’s the step-by-step process for using this tool to implement schema in Shopify:
- Go to the Structured Data Markup tool and select “products” as your data type.
2. Find a product from your Shopify store with a review and rating.
3. Paste the URL of that product page in the Structured Data Markup Helper URL field and click “Start Tagging”
4. Highlight the section of the page you want to tag. In this case, we’re going to focus on product reviews and ratings.
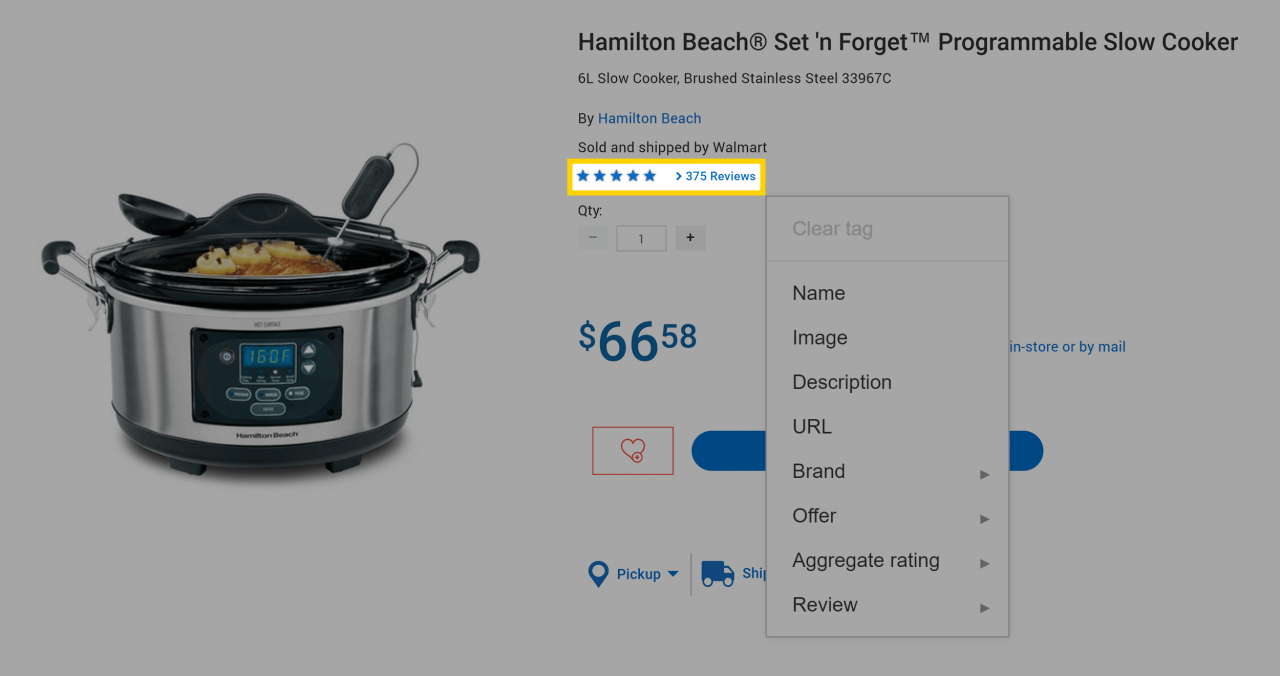
5. If your product was reviewed by a single person, choose “Review”. Then highlight the name of the person that reviewed the product, the date of the review, etc.
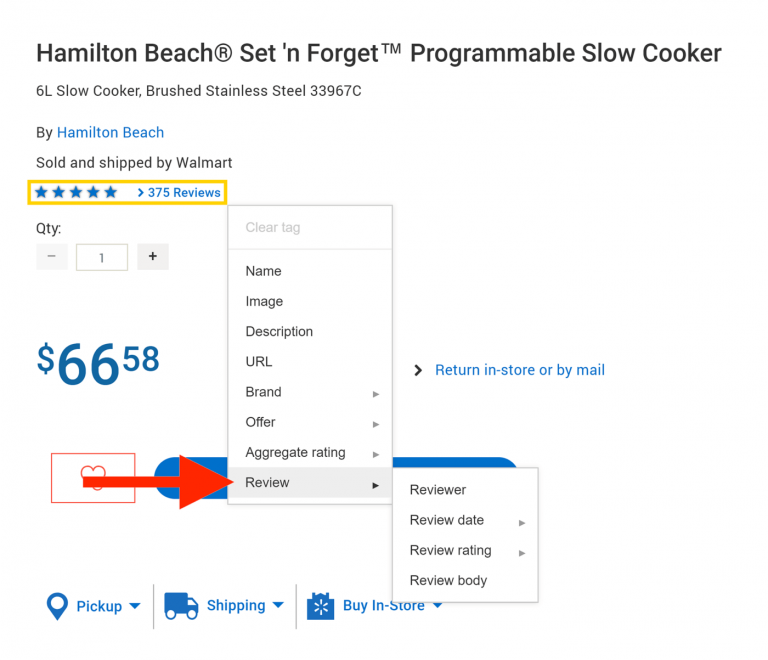
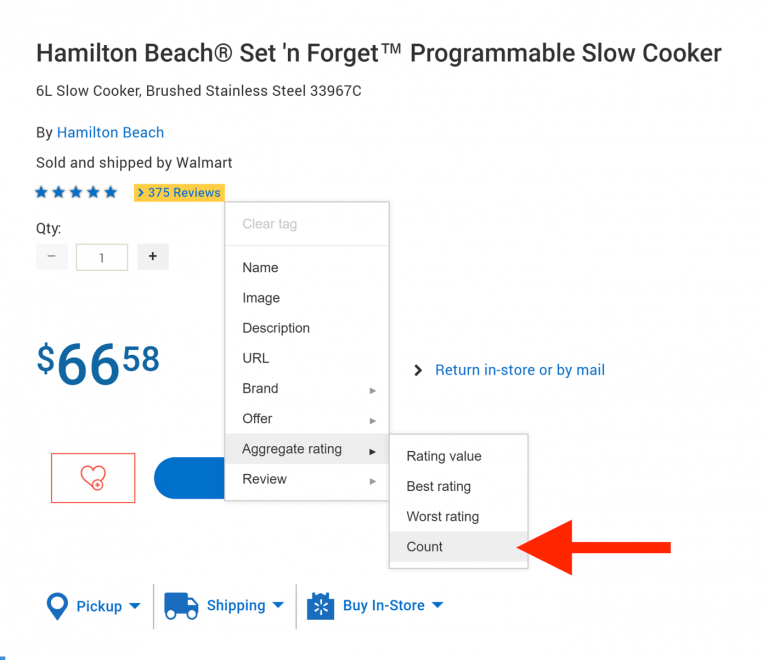
6. If multiple customers reviewed the product, highlight the number or star rating, and select “Aggregate Rating”.
7. Make sure to provide as much info as you can. For example, don’t forget to highlight the number of reviews and choose the “count” tag.
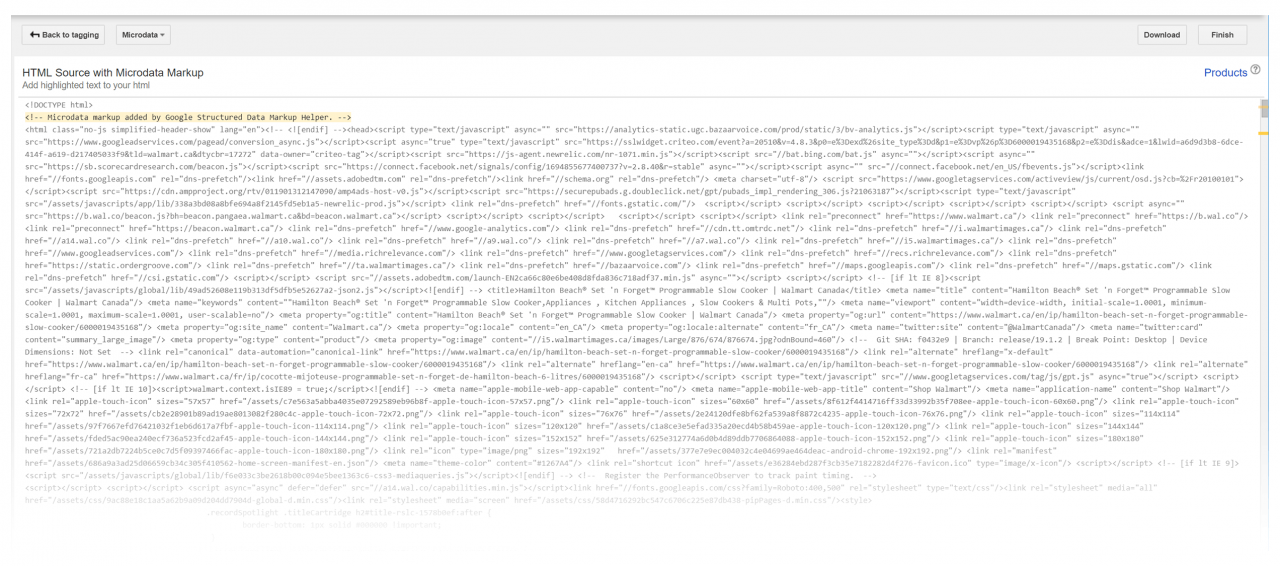
8. When you’re done, choose “Create HTML”.

9. You can either copy and paste this new HTML into your page or add the new Schema markup to your existing code.
Without the help of a developer, we do not recommend editing your main website. Instead, you can use apps like JSON-LD for SEO to implement schema changes and add markups.
Page Speed Optimization
Like any other CMS platform, you’ll want to add themes, apps, and third-party plugins to your website. However, these all take up a lot of server space and can seriously slow down your store.
Optimizing the page load speed of your Shopify website should be one of your top priorities. Why? Slow websites lose orders to fast websites. A page load time delay of 2 seconds is associated with a 103% increase in bounce rate (Akamai).
Don’t worry! There are a few different ways you can optimize your page load speed:
- Use a custom theme and build your store from scratch. Although this option is more expensive, it will allow you to keep track of what you’re adding to your site. If your budget is tight, you can also opt for using a lighter theme instead.
- Avoid using apps when possible, and hire a Shopify expert instead. Every time a webpage loads, it must also load the code for all the apps on your site, which can significantly decrease page speed. A Shopify expert can help you add code snippets in the page source so you can use fewer apps and optimize your page speed.
- Serve images through a CDN (content delivery network). Luckily, Shopify runs on a world-class CDN!
- Implement lazy loading for your images.
- Implement all the tracking scripts in Google Tag Manager. This will help to reduce the number of requests that pages make while loading.
5. Link Building for Shopify Websites
Great work making it this far in our Shopify SEO guide! Now that we’ve covered the on-page and technical aspects of your Shopify store, we’re finally ready to dive into our final section on link building!
According to Google, link building is just as important as content! External links to your Shopify store build domain authority, drive traffic, and increase consumer trust in your brand. Think about it – if you see a Shopify product mentioned on another website, would you be more likely to purchase that product? Probably!
For Shopify stores, one of the best ways to get backlinks from external sources is through blog content. The more blog content you have, the easier it is to get backlinks. We’ll discuss additional ways you can build links to your Shopify store in the following sections.
Find unlinked mentions
Let’s first start with the low-hanging fruit: people who are already discussing your products but have yet to link to your Shopify store. This is an easy and effective first step for diving into the world of link building
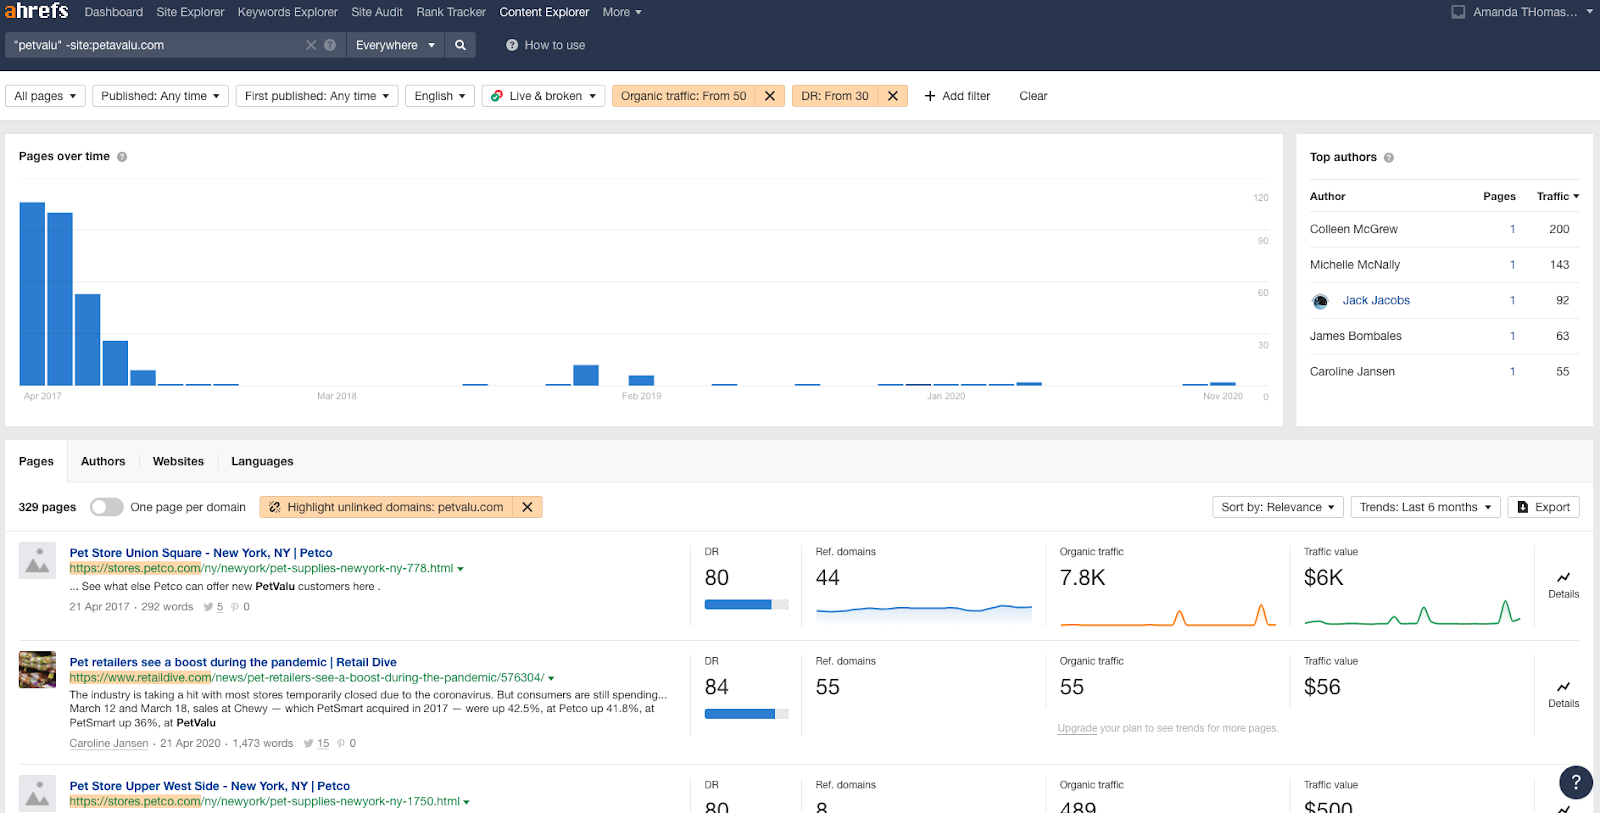
Ahrefs is a great SEO software that can help you find unlinked mentions. In Ahrefs, the Content Explorer is a mini search engine that will help you find pages and see mentions about your brand. I’ll use the example of the store “petvalu” to show you how it works.
1. Start by searching for your brand name in the Content Explorer and exclude results from your website. As you can see in the photo below, I’ve entered “petvalu” -site:petvalu.com. You can swap out “petvalu” for your domain when searching.

2. Add filters to get linked mentions from better-quality pages. I am looking for only English pages with domain authority (DM) of more than 30 and at least 50 organic visits per month.

3. The primary goal here is to build links from unique pages that don’t link to you. So, I will use the “highlight unlinked mentions” feature, which will highlight the sites that have never linked to you.

4. Next step is to export these links and find contact information. You can use a tool like hunter.io which will provide you with 5-10 email addresses for each domain.
5. Finally, reach out to these contacts and ask them to link the content mentioning your brand name or products to your website.
Get your Products Reviewed by Sending Free Samples
After tackling the low-hanging fruit, you’ve got to work a bit harder to build links to your Shopify store. One of the strategies you can take may be to send free samples of your products to people (most likely bloggers) who write about your industry or niche market. Sending them a free sample might inspire them to write a review about your product on their blog or website and link to your Shopify store.
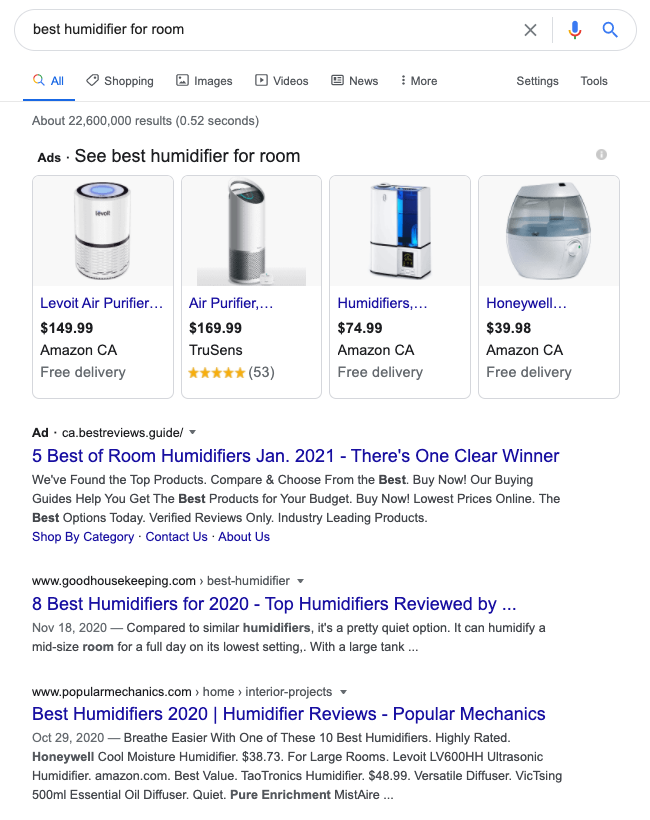
For example, check out the link on the goodhousekeeping website to a Honeywell Humidifier:
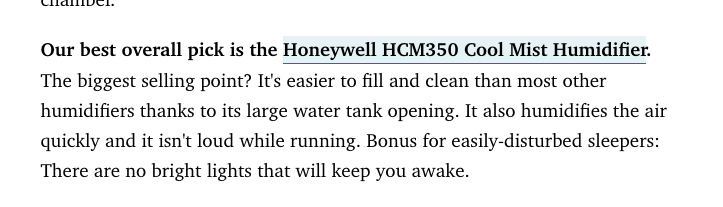
Try using the following Google search for one of your product categories: “best [keyword or category]”. This will give you an idea of who is writing content that would benefit your brand.
Reach out to these sites about sending them a sample. Remember, you can use the hunter.io tool to find 5-10 email addresses for the site. It’s also a good idea to ask these people for a product review so it doesn’t seem like you’re bribing them in exchange for links!
Guest Blogging on Relevant Sites
Guest blogging is another effective strategy for building relevant links to your website. You can easily write a valuable guest post on relevant websites and add links to your site.
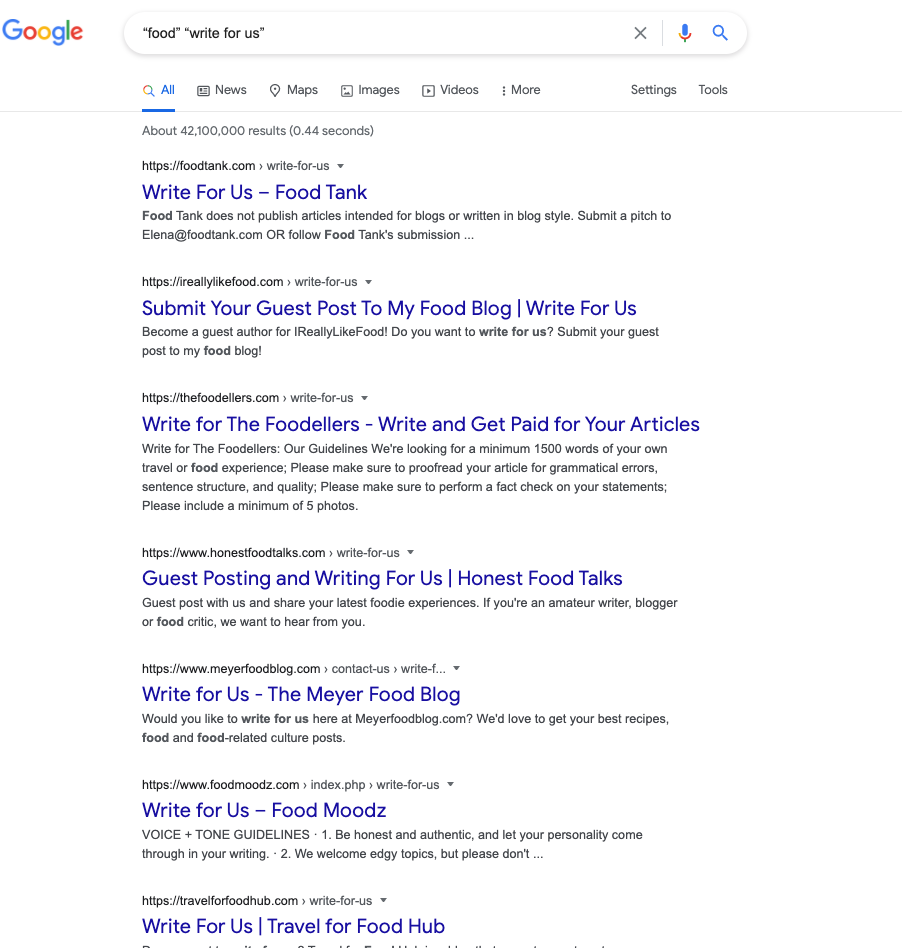
One of the best ways to find guest posting opportunities is to use advanced search operators through Google. For example, you could try “[keyword]” “write for us” or “[keyword]” “submit guest post”. This will give you the sites in your niche that are open to guest posting.
Reach out to the blogs or websites that make sense to your brand. It’s a good idea to include a few pitches on topics you’d like to write about and attach previous content you’ve written so they can get a sense of the quality of your writing.
Ideally, you want guest posting to be a mutually beneficial experience. You’ll get to build links to your store and they get awesome content to add to their website.
Shopify SEO Yourself Or Hire An SEO Company?
Congratulations on making it through this entire Shopify SEO guide! You now have strong foundational SEO knowledge that will help you boost the search rankings of your Shopify store. If you feel like you’ve got a good handle of the information covered in this guide, it’s time to put your knowledge into practice and get to optimizing!
However, if your head is spinning from all that information, the SEO experts at Konstruct are always here to help. You may have heard the saying: “if you want something done right, do it yourself.” However, this doesn’t always apply to SEO! New strategies, technologies, competition, and paid marketing spending changes make SEO a constant battle.
With new search algorithm updates dropping every 2 weeks, it can be super tough to keep on top of new SEO best practices in addition to the foundational knowledge covered in this article. In order to ensure that your organic traffic continues to grow (or at least stays consistent) it’s always a good idea to hire an SEO expert. Reach out to the SEO experts at Konstruct Digital today!
Frequently Asked Questions About Shopify SEO
How can I Improve my eCommerce Store SEO?
Unfortunately, SEO isn’t as easy as adding a plugin to your Shopify store! You’ve got to put in the time to establish an SEO strategy. In this article, we have covered how to build an SEO foundation for your Shopify platform covering technical aspects, keyword research, on-page SEO, and link building. However, hiring an SEO specialist will save you time and energy, help you put a solid SEO strategy into place, and improve your organic ranking consistently.
How do Shopify Stores Rank on Google?
Like any other platform or website, if you follow all the fundamentals and build a strategy, your Shopify store can rank on Google. With Shopify, there are default sections to help you optimize SEO. However, for more advanced SEO, you might need to use app integrations or customize your theme.
Is SEO Important for eCommerce?
Google receives 1 out of every 5 initiatory product searches. This amounts to potentially hundreds of millions of queries each day! This means that the search engine ranking of eCommerce websites is just as important as any other site. A higher SERP ranking leads to more organic traffic, which ultimately leads to more sales!